Here are some tips and features that you might find useful if creating a large, multi-page document, such as a piece of ICT coursework. Or any document for that matter!
Tables
Tables are a very useful feature in Word. Not only are they useful for creating tables for things such as tables of results, but they can also be used without borders to help you to position text on the page; for example as an easy way to create columns of text. You can also merge and split cells, for example to create a heading that goes across two columns.
It is quite easy to create a table; just select Insert Table from the Table menu and select the number of rows and columns you require. You don't need to worry too much about the number of rows as it's a simple matter to create an extra row at the end of the table; just position the cursor in the last cell of the table and press the Tab key.
Convert Text to Table
This is a useful option on the Table menu that allows with to create a table to contain text that has already been entered. You need to highlight that text before you select the option.
Page and Section Breaks
Sometimes you want to start a new page before you get to the bottom of the first one. You can insert a page break (i.e. start a new page) by pressing Ctrl + Enter.
If you're using columns, you can insert a Column break to start typing in the next column by selecting Break from the Insert menu, and then choosing the column break option.
You can also create sections in your document in the same way (i.e. by selecting Insert → Break and choosing the section break). Using sections allows you to have a different header or footer in the same document, and also to restart the page numbering if you wish (to include the section number, e.g. 1-1, 1-2, 1-3, 2-1, 2-2, etc.).
Images and Wrapping

Sometimes you might want to insert an image into your work and have the text flow around it. This is called wrapping. You can adjust how the text flows around your pictures by clicking on them with the right mouse button, and selecting the Format Picture (if you've inserted something like a graph from Excel, there will be a Format Object option in its place) option.
On the screen that appears there is a Wrapping tab on which you can select exactly how the text flows around the picture. You can create a "watermark" by selecting None as the wrapping type, and fading the image using the Controls on the Picture tab.
If you insert more than one picture, one may cover the others. You can layer the images and select which go on the top by clicking the right mouse button and making a selection from the Order submenu. This menu can also be used to send pictures behind text if you want to label an image or use a watermark.
Tables of Contents
You can get Word to automatically create a table of contents for you. The simplest way to do this is to use the heading styles that appear in the formatting toolbar. If you open the combo box that defaults to "Normal", you'll notice that there are other styles, named Heading 1, Heading 2, etc.
Use these instead of the bold, italic and underline buttons when you put headings into your documents. Use Heading 1 for the main headings, Heading 2 for sub-headings, and Heading 3 for sub-headings within in the subheadings, etc. If you want to number your headings, you can use the Bullets and Numbering option on the Format menu.
To create the table of contents, all you need to do is select Index and Tables from the Insert menu. Click on the Table of Contents tab, select the style you want, and click OK.
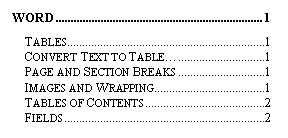
In this document, I have used Heading 1 for the Word title, and Heading 2 for the others. Inserting a Formal table of contents produces the following:

(this table has been made narrower to make sure it fits on your screen - the real one would fill the width of the page.)
Fields
If you want something such as a date, page number or filename into your document, you can use fields. Fields are inserted using the Insert menu, and can display all sorts of information about the document and the computer system. The table of contents is also a type of field.
There are various dates you can include, for example:
- Create date
- Print date
- Save date
and information about the file, such as:
- Author
- Page number
- File name
- File size
You can include information from the Properties box (File → Properties), so that if you often refer to your document title in the document, you can enter it once in Properties, and then if you need to change it you only have to do it once and the whole document will be updated automatically.
Fields are normally updated when you open or print a document, but if you want to update a field explicitly (e.g. to include new sections in your table of contents), click on it, and then press the F9 key.